Showing posts with label aftercare. Show all posts

Wednesday, 25 March 2015

My Makeup Brush Collection.

Link to the photo of my brushes: HERE

I've only recently (within the last 6 months or so) gotten into makeup, so my brush collection isn't huge. I only actually have 14 brushes, 3 of them being double ended brushes. 

Real Techniques Brushes.


Disclaimer: This is not my photo.


I have both the original real techniques sets, which I believe are absolutely perfect for beginners. You can buy both sets for a lot less that in store on Amazon, which is where I got mine. I paid around £25 for both the sets, which I think is an absolute bargain! I don't use the foundation brush, and I find it a bit too flimsy for my liking, but the rest of the brushes are so soft and versatile, the sets really do provide you with everything you need as a beginner. 

Urban Decay Brushes.

I have all 3 of the Naked palettes, and each palette comes with its own brush- which I have removed and store with my other brushes. The original Naked palette comes with a flat rigid eyeshadow brush, which works really well to pack on eyeshadow, Naked 2 had a two sided brush, one side is a smaller version of the original brush, the other is a big fluffy crease brush, which I use nearly every time I wear eyeshadow. Naked 3 also has a double sided brush, however unfortunately, both the Naked 3 and the Naked 2 brushes have duplicate flat eyeshadow brushes, which is a shame considering how much the sets cost. However, the naked 3 does have a flat fluffy brush which is amazing at blending. 

Estee Lauder Brushes.


I did use to have the whole set of gold Estee Lauder brushes, however I lost the smaller lip brush and the bigger powder brushes were way to flimsy for me to use. I do like the smaller eyeshadow brush, though I wouldn't buy it again. The fact that its shorter than the powder brushes gives it more stability, however it is still very flimsy and can be hard to work with. Fortunately for this brush, its mobility makes it a good blending brush. 

Wilko Brushes.


I would never have considered buying Wilko brushes if I had just walked into the store, however, after they first launched, everywhere I looked there was nothing but great reviews! I decided to head in and pick some up- considering the most expensive brush is only £4, you can't really go wrong. I chose the concealer brush and the smokey eye brush (which is double ended), and they have really lived up to the reviews. Although they are only cheap, they have held their shape very well, which is impressive considering I use the angled brush all the time. I already have a concealer brush from the real techniques collection, and so I use the concealer brush as a lip brush, which works surprisingly well!


I'm hoping to buy more brushes soon, as there are a lot of brands I've heard about and want to try, plus my collection seriously needs expanding! Let me know what brushes you use down below!


Tuesday, 10 March 2015

Building Confidence Without Makeup

Living without makeup can be hard, but having a bare face shouldn't stop you from walking out of the house. Makeup used to act like a mask for me, I had very bad skin and didn't feel comfortable leaving the house without wearing a full face. Now I have built up my confidence to the point where make up is something fun and exciting, instead of a chore.

I really believe that everyone should be able to feel comfortable in their own skin, personally, I went down the 'cold turkey' route. I gave up makeup almost completely for a good 4 years. I believe that doing so helped me build confidence in my own skin, and makes me a happier person. So, I'm going to share a few of my tips and tricks to ease yourself into wearing less makeup.

I am not, in any way, saying that everyone should stop wearing makeup. Makeup is an amazing thing. I just believe that everyone should be allowed to feel comfortable in how they look, and being confident without makeup is a huge step in building confidence in yourself!


1. Remember, Makeup Should Be Fun!

The most important thing to remind yourself is that makeup is something that should be fun, you should be able to be creative and wear crazy makeup looks, or spend hours applying it and having fun. However, it shouldn't be something that takes over your life, unless you count spending all your money on new makeup goodies.

2. Try A More Natural Approach.

It's obviously a lot easier to ease into it rather than just jump in, that's how I approached the task. You could simply try wearing a more natural 'no makeup' look, and work from there. Try toning down the level of coverage, for example, wearing a BB cream or powder foundation occasionally instead of full coverage foundations. I also started dying my eyelashes in place of mascara for a long time, I found that dying and curling them provided enough length and darkness that I was comfortable with how I looked. Another benefit of this is that the health of my skin and eyelashes improved drastically when I cut down on my makeup wearing. 

3. Invest in Skincare.

It's a whole lot easier to feel comfortable with the way you look if your skin is looking healthy, when I first gave up makeup I invested a lot of my money into my skincare routine. I think this made the transition a whole lot easier, and as my skin became healthier my confidence rose. This will also give you a chance to get to know your skin a little bit better.

4. Try Limiting You Products.

Tell yourself you're only going to use 5 makeup products, then stick to it. You'll find you'll choose product that cover the areas you're most insecure about. Then, start cutting down the product slowly. My everyday routine tends to be under eye concealer and a setting powder, as this is the area I'm most insecure about. Once I was able to fully pinpoint my insecurities, it was a lot easier to overcome.

5. Go Out Without Makeup.

You don't necessarily have to spend the whole day without makeup, but if you're going out to the shops or somewhere similar, consider leaving without any makeup. Making small trips without any makeup on really helps build up your confidence, and it will be such a good feeling when you're finally brave enough to spend a day in college or at work without any makeup on!


I hope this helped someone, if you have any suggestions or tips please leave them in the comments!

Friday, 6 March 2015

99p Bargain


I recently ordered one of this scary looking contraptions off eBay for just 99p including shipping. It's used to remove blackheads and spots, and I've been rejoicing since I ordered it. I use it in the bath around once a week to really clean out my pores, and I think my skin is thanking me. I've noticed a dramatic decrease in the number of breakouts I'm getting since I started using it, and my skin has been looking a lot smoother .So I recommend you go pick one of these up if you haven't already.

Please remember to check the side bar for updates on what's coming next!

Thursday, 5 March 2015

My Favourite Lush Products

I am a big fan of Lush product, I truly believe that everything they sell is worth the money they charge, so here are my favourites from their store so far.

1. The Charity Pot.


Not only does it serve as a killer moisturiser, but also 100% of the profits go to charity! (Except taxes, they go to the government).

2. Rising Phoenix Bath Bomb.

I've tried nearly every bath bomb lush sells, but this is one of my favourites. The scent is described as cinnamon on the website, which is one of my favourite all time scents. The bath bomb itself is layered full of different colours and golden glitter, which turns the bath an amazing colour!

3. So White Bath Bomb.
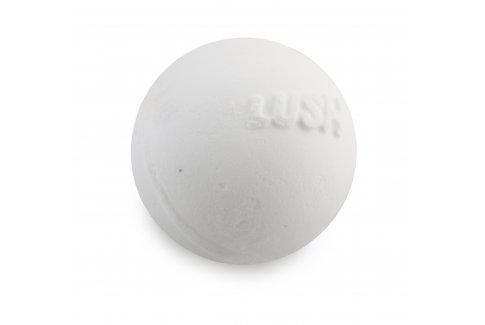
This was one of the first bath bombs I ever bought from lush, and I've been re-buying it every time since. The bath bomb itself looks pretty boring, however once dropped into the bath it reveals a pink centre. The scent is clean and fresh, which I love.

4. D'Fluff Strawberry Shaving Soap.


I was very sceptical about this at first, but it was recommended to me so I decided to try it out. I was blessed with almost white, very thin and slow growing leg and arm hair, so rarely have to shave. This means that products like this don't normally do much for me, as I don't shave often enough to develop dry or flaky skin, but this product surprised me- it leaves me with the softest feeling legs you could possibly imagine, and you only need the tiniest bit! Plus, I love strawberries, which is a bonus.

5. Jason and the Argan Oil Shampoo Bar.


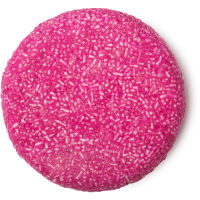
I will warn you guys, this thing smells super strong. It's a great scent but you can smell it from miles away. Nonetheless, it gives my super thin hair life and body, which is what I want from a shampoo, and it's super long lasting!

6. Mask of Magnaminty.


I wouldn't usually go for this product, as I absolutely hate the smell of mint. However, it claims to reduce redness and blemishes, and I've found that all lush products so far have done exactly what they say on the tin. My skin has been playing up the last couple months, and I have no idea why- so I needed something to help calm it down. This isn't a miracle fix for blemishes, but it will reduce them and help calm you skin over time, which is what I'm looking for. I use this once a week and I find that it really helps keep my skin in control!


Wednesday, 4 March 2015

How I Bleach My Hair White

My hair has been bleached white fairly frequently for the last few years:
Photo
Photo
And over this time I have learned a few things about keeping my hair healthy looking whilst still achieving the lightest colour possible. So, I decided to share a few tips and tricks that I have learned along the way. 

1. Coconut oil.


Everybody knows that you shouldn't bleach clean hair, but why? Well, when our hair gets greasy, the oil forms a protective barrier against the bleach, stopping it from drying out or getting damaged. As I don't like to leave my hair get too greasy before bleaching it, I tend to use coconut oil on second day hair instead. Coconut oil is solid, but has a very low melting temperature, so I scoop out a small amount- warm it in my hands and then apply a thick coat all over my hair. I tend to leave this on for around half hour before bleaching, as coconut oil is really good at adding moisture to your hair. 
Don't bother buying special coconut oil branded for use on hair, as organic coconut oil will be cheaper and does the exact same job. You can find this is your local grocery store or organic health food shop. 

2. Generic Bleach.
Rather than use a coloured bleach, such as a cool ash tone or a honey blonde tone- I choose to use a bleach which does not contain a toner and tone my hair myself afterwards. The bleach I use is Jerome Russell's Bblonde bleach in medium lift, as I have a pretty light hair colour naturally.

I choose to use this bleach as you get the bleach sachets and developer separately so there is little to no waste, and I've found that using this bleach allows me to get the lightest colour my hair is capable of achieving.

4. Bleaching Technique.
There's nothing complicated about my bleaching technique, but I thought I should share it with you regardless. Basically, I split my bleaching sessions into two parts. First, I will apply bleach to my roots and the darkest parts of my hair, such as sections which didn't lighten as much last time. I will leave this on for around half an hour (or half the time noted on the bleach box). Then, I will go back and apply more bleach to the rest of my hair, concentrating again on the darkest spots. 

I don't always bleach my whole head, only if a lot of my hair isn't the colour I want it to be yet- as I do frequently change between my natural hair colour and white blonde.

3. Fudge Clean Blonde Toner Shampoo.


Toning is a really important part of achieving the right colour, personally I prefer an icy white colour, and so I use a purple toner. My favourite way of toning my hair day to day is to use a toning shampoo, which is just what it sounds like- a shampoo containing purple dye to counteract the yellow tones in your hair. My favourite one so fair is the Fudge Clean Blonde Violet Toning Shampoo. I apply this like regular shampoo, lathering it all over my hair, and then leave it on for five minutes or so, depending on how yellow my hair is looking at the time. It's a really easy way of keeping your colour up to check.

4. D.I.Y Toner.
If this option doesn't really appeal to you, you can save a lot of money by making your own toner or toning shampoo. All you need to do is buy a dark purple hair dye, my favourite is the directions violet hair dye.

You can either add a small amount of this to your shampoo and use it like above, or alternatively you can mix it with conditioner to achieve a pale purple colour and then apply it to your hair, leaving it on for around half an hour. Though it does take a little bit of trail and error to learn what shampoo to dye ratio works for you, it's a very good way of saving money!

If you have any more questions regarding my bleaching technique, please feel free to comment.

Tuesday, 3 March 2015

My Experience With Piercings.


I don't have many piercings, I've had 10 total. However, I've decided today I would share with you my experience overall. I've included below some photos of my piercings, and will talk about them in chronological order.


Please excuse the bad quality photos, they are from Instagram and I had to zoom in on a lot, especially the middle one.

First and Second Lobes
I got these done, as most young girls do- at a beauty salon with a gun. I do NOT recommend EVER using a gun when having a piercing, even on lobes. They are extremely unsanitary and will cause extreme trauma to the ears- just watch this 1 minute video:

However I was too young to know better and my parents had been brought up to believe they were fine. 

My second lobes, however, I got pierced with a needle, which made for a much quicker and less painful healing experience all around. Lobe piercings are pretty easy to heal in most peoples experience, and don't take an awful lot of effort.

Vertical Ear Rim
I'm not exactly sure what to call this piercing, as I haven't seen it around much. It's the golden stud at the top of my ear, and I loved it to pieces. It was pretty painless considering it was my first cartilage piercing, and healed pretty easily to begin with- However, after knocking it very hard accidentally, it became very agitated and sore. Unfortunately, I recently had to take it out, as it started to migrate. 

Anti-Tragus
This is the piercing shown in the last picture, that goes through the inside nodule of the ear. For me, this was my most painful piercing by far. It's been around 8 months since I had it done and it still hasn't come close to healing. It's finicky and easily agitated, but I love the way it looks so much I am determined to keep at it. Most anti-tragus piercings take around a year to heal, so I am awaiting the day! I'm currently wearing an anotometal curved barbell.

Septum
My septum was the easiest piercing, both to have and to heal. The piercing itself felt like a very intense sneeze, and my nose stung a little for the rest of the day. However after that the healing was quick and easy. The nose is pretty much self cleaning, and so you are advised to clean it less regularly than most piercings to avoid over cleaning- which is handy if you tend to forget like me. Healing took around 8 weeks, and I can now leave the jewellery out for a short period of time without the hole closing up. If you're thinking about getting your septum pierced, I'd definitely go for it!

Auricle
This piercing is located on the middle of the ear rim. I am currently wearing a moonstone labret from Neometal (Comment if you want me to make a separate blog post about after-care and jewellery). This piercing was virtually painless and hasn't caused me much trouble at all to heal.

Industrial/Scaffold
Again, this piercing didn't hurt much for me- the piercer pierced the bottom portion of my ear first, which stung a little and then pierced the top portion, which I didn't even notice. The main problem with this piercing for me has been the healing process. They tend to take between a year and a year and a half to heal, and during that time it tends to be sore a lot due to the extra pressure of the long bar. Also, be warned that if one end of the piercing gets agitated, the other end will soon follow. 

Nipples
Yes, I have both my nipples pierced, and yes- it hurt. A lot. Surprisingly though not as much as my anti-tragus hurt, and not so much that I wouldn't do it again. However I did swear pretty loudly during the process. I've had a breeze healing them so far, with no problems what-so-ever. Though I don't wear a bra, so I feel as though that makes a difference, as I know they can be very difficult to heal for some. 

Conch
I was very scared of getting my conch pierced, as its a huge bit of your ear! But after wanting it for so long I decided to go through with it. I was pleasantly surprised at how painless it was, the only part that hurt was the needle coming out of the skin behind my ear, and then the jewellery switch. I'm currently wearing a neometal lavender opal in it.


Got any questions about piercings? I'm more than happy to do an Q&A, after-care or jewellery posts.